10.31.2011

happy Halloween!

just landed back in LA after a wonderful, whirlwind trip to Portland, OR and the Columbia River Gorge. I have tons of photos to start weeding through and editing, in the meantime here's pics of the fall bouquet I had in the dining room before we left...sadly when we came home it was stinky and wilted and had to be tossed.


I wish I remember what those orange pom-pom flowers were called, I got them at the farmer's market...don't they look like something out of Dr Seuss?  they also smelled really nice.  I was sad we couldn't carve a pumpkin this year (since we were out of town) so these flowers were the next best thing.

hope you all have a wonderful Halloween!

10.27.2011

the joy of looking


snapped this on my morning walk... just a leaf floating in a puddle by my feet but something about it made me stop.  I love the random blue dot of paint and the interesting parallel arcs.

Josh and I are off to Portland tomorrow for the weekend!  can't wait to wander around and take photos, eat good food and drink lots of local beer.  I'm even hoping it's cold and rainy, so I can wear all the stuff I've been knitting!

10.24.2011

studio dreams

I've been dreaming lately of what I can do with my office... which is just half of the second bedroom in our apartment, but it's where I spend most of my day when I'm home, sewing, knitting, and reading design blogs.  what I'd love is a space that I can call my "studio"....like one of those impressive artsy girls I see on blogs all the time...and say it with a straight face.

I've been bookmarking beautiful craft rooms and "studios", and trying to get inspired to buy shelving and functional furniture (which, let's be honest, isn't that inspiring).  I like this one from Martha Stewart:


but it looks like you can't do much more in this room than have tea and hang wrapping paper out to dry.  still, I love the green walls/white furniture combo, and the funky rug.

here's the current state of my creative space:

basically just a sewing table, a bookcase full of vintage craft books, and a cat getting hair on everything.   I have my favorite bits of vintage needlecrafts hanging on the wall.  next to Stoli is a shawl I knitted months ago and am planning to dip-dye...eventually....

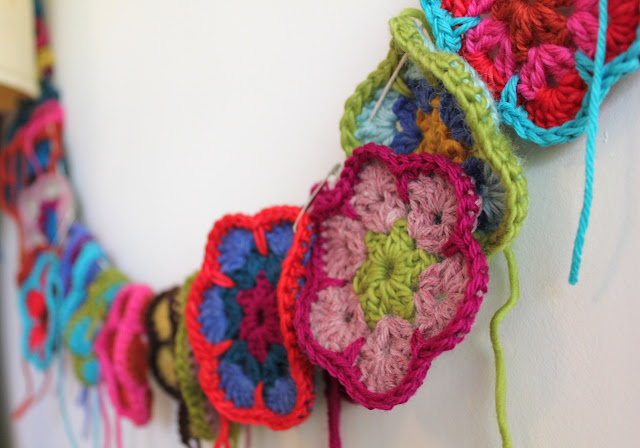
here's a close up of the crocheted flowers on the wall...I make them when I'm bored or only have 15 minutes to make something.  I just keep adding to the garland and having them visible reminds me to keep working on them.


and here's my sweet boy, who is always by my side when I'm working at home.  at the moment he's sleeping in the laundry basket next to my chair.


everywhere I've lived, I've always plopped my sewing machine down in a corner and just tried to keep it from being a total mess.  maybe it's time to make myself a space that really inspires me?  even...dare I say... a studio??

10.19.2011

penguin sweater UPDATE

they have enough sweaters!  more than enough, actually.  the organizers of this sweater drive say to send in any finished sweaters as they will keep them for future spills (so sad that that's a foregone conclusion) but please don't make any more.  they are overwhelmed and thrilled by the response, though.

details here


10.17.2011

sweaters for Tauranga penguins

have you heard about the oil spill in Tauranga, New Zealand?  yea me neither, until I heard that they needed people to knit sweaters for penguins.  it happened a week or so ago, and as of today they are still trying to clean up the mess in NZ.  this yarn store there called Skeinz is collecting sweaters to keep the little guys warm after they have been cleaned (and stripped of their natural oils).

I made some (modeled below on a Bacardi bottle), and in the process wrote up a row-by-row pattern for more newbie (also American) knitters to follow, as the pattern that's out there is very brief and metric-y.  I am sure there are much better ways to do this, but it worked for me.

Penguin Jumper

Yarn:  8 ply 100% wool yarn (must be wool because the penguins will try to eat them)

Needles: US size 3 straights, US size 5 straights, US size 3 double pointed
Using the size 3 straights, cast on 36 stitches
Row 1-7: k1, p1
Switch to size 5 needles
Row 8: k1fb, (k2, p2 to last 3 st) k2, k1fb (38 stitches) 
Row 9: k1fb, k1, p2 (k2, p2 to last 2 st) k1, k1fb (40) 
Row 10: k1fb, p2 (k2, p2 to last st) k1fb (42) 
Row 11: k1fb, p1, (k2, p2 to last 4 st) k2, p1, k1fb (44) 
Row 12: p1, (k2, p2 to last 3 st) k2, p1 
Row 13: k1, p2 (k2, p2 to last st) k1
Repeat Row 12-13 until work measures 6 inches. End on WS row. Begin to decrease:
Row 14: p1, p2tog (k2, p2 to last 5 st) k2, p2tog, p1 (42 stitches) 
Row 15: k2tog, p2 (k2, p2 to last 2 st) k2tog (40) 
Row 16: k1, k2tog, p2 (k2, p2 to last 3 st) k2tog, k1 (38) 
Row 17: p2tog, (k2, p2 to last 4 st) k2, p2tog (36) 
Row 18: repeat row 14 (34) 
Row 19: repeat row 15 (32) 
Row 20: repeat row 16 (30) 
Row 21: repeat row 17 (28) 
Row 22: k1, p2, (k2, p2 twice) k2, p2tog (k2, p2 three times) k1 (27 stitches)
Transfer stitches to one of the dpns. Break yarn, leaving a tail for sewing. Repeat steps above to make second half.
Transfer the stitches from both pieces to three dpns, 18 stitches on each needle. Work 10 rows of k1, p1 rib. Bind off.
Sew up sides from bottom edge to the point where you started decreasing.

I think they will probably get plenty of sweaters, a similar call after a spill in Tasmania netted 15,000!  If you make some and you're on Ravelry, link them to the "Penguin Jumper" pattern, which the people at Skeinz are using to keep track of how many are being made.

This link has the info on where to send them.  start knitting, the penguins need you!

10.13.2011

obsessed with ombre


I've been google-ing (googling?) "ombre" a lot lately.... working on a new project.  and I keep getting results for hair and nails.

I've already got the hair going on (unintentionally... my roots are BAD) but I was bored yesterday so I tried the nails thing.  I had to use whatever colors were already in my bathroom, but I really love the idea of shades of grey to white...

anyway, I dig it.  but can I just say, it's impossible to take a good picture of your own nails.  you are required to make a weird claw shape with your hand.  I went with the "holding an invisible ice cream cone" pose.

10.11.2011

chair fame

well!  I really didn't realize that sending my little chair makeover into Design*Sponge would have caused such a surge in blog traffic over here at humble little Craftnik...but, if you're coming here for the first time...or if you're actually coming back a second time...welcome!

seriously, the chair has been extremely popular.  I'm not sure but I think the chair might be thinking it's too good to hang out with me now and would prefer to go live in a nicer apartment with a good blogger.

the chair should probably have it's own twitter account.  @denimchevronchair?  I do have a twitter account, but I only set it up for the purpose of stalking the Grilled Cheese Truck.

yes, as you can see by the puny "archives" over there on the right...I am a terrible blogger...and I repeat a post on that theme once every couple of months.  (but I am forever hoping to get better)

it didn't help that the day before the post on Design*Sponge, I was in a car accident.  first day of rain in LA = lots of dumb accidents.  nobody was hurt, but my little car (that I love) was pretty badly damaged.

all I wanted to do for a few days was turn off my brain and knit.  there is something to be said for the repetitive, easy work of knitting that can just chill me the eff out.  I'm just beginning to get immersed in the whole knitting world (and it is a huge and organized and passionate world, I gotta say) but I came across this quote from Elizabeth Zimmerman that really summed up how I got through the last few days:

"Knit on, with confidence and hope, through all crises."

kinda the crafter's version of "Keep Calm and Carry On", no?

so that's what I'm doing...I'm knitting on...and I'm planning the next project...and I promise to blog about it.

(this soon to be finished cowl already has a twitter and is on Google+)

10.05.2011

a little desert

found this pretty pottery at the thrift store and filled it with tiny cacti...


it was in the background of my chair pics but it's so sweet I thought it deserved a better look.  doesn't that one with the flowers look like a little alien??

10.04.2011

the really big chair post

Some projects can be done in an afternoon.  others...require a more full-time commitment.  this one is the latter...

so I found this Plycraft lounger on the corner one morning about a year ago.  it was in pretty bad shape, but hey, free chair!  (this is the same spot where I found an authentic Eames RAR armshell chair a year earlier...every time I drive by now, I cross my fingers)

here's the before pics:

the bent plywood back was in particularly bad shape, all dry and scratched and water stained.  the black vinyl upholstery was also cracked and grimy.

BUT...I decided it had potential.  I just wasn't sure what that potential was, exactly.  so it sat in my living room looking pitiful and neglected (except when it was covered with new afghan and pillow projects)

it needed to fit into the new "Big Sur meets Ace Hotel meets Denmark" thing I have going on in my new apartment.  and it needed to hold up to crazy cats and big manly boyfriends.

then about a month ago I saw this Anthropologie chair, and I knew what to do.  I took my chair apart.  then I bought a bunch of jeans that were half price at Goodwill (making them about $3 a pair) and started cutting...

 I cut up jeans for a LONG TIME.

then I stopped remembering to take photos of my process (bad blogger, as usual).  But basically my process was this:

1.  start watching season 2 of the X-Files on Hulu.
2.  cut jeans into pieces of flat denim, then cut those pieces into hundreds of 7 inch strips with mitered edges.
3.  lightly glue strips to dark blue backing fabric using fabric adhesive in a chevron pattern, and then top stitch all the edges down using a zig-zag.
4.  start watching season 3 of the X-Files.
5.  make a crap load of piping (see stated hatred of piping making here)
6.  stretch and staple fabric and piping around cushions.
7.  change foam on armrests (the old ones were weirdly large).  Realize you forgot to make chevron fabric for armrests.  curse and pout and then do that.  Staple all that down.
8.  Switch to Law & Order SVU for a while.  (why is season 13 so weird looking?!?)
9.  clean plywood with Murphy's Oil Soap, sand, and clean again.  Rub on Restore-A-Finish (walnut color) and be freaking AMAZED by the results.  when that's dry, apply Howard's Feed and Wax.  run your hand lovingly over the beautiful smooth new finish.
10.  re-assemble the chair, being super glad that you drew diagrams and put all the different screws and bolts in neat little envelopes when you took it apart a month earlier.
11.  take the after photos:


Yes, it took at LEAST 40 hours of labor.  I didn't exactly keep track, and that's good because it was often extremely repetitive and boring.  but only about $50 worth of supplies, including buying a new staple gun.  pretty good compared to the $598 price tag on the Anthro version!  

but none of that matters, anyway.  because I love it.  :)